

2 Cups Sugar to 1/3 Cup Liquid: 30 Donut Glaze Ideas for Home Bakers
Every good donut glaze starts with the same three ingredients: powdered sugar, a liquid, and a flavouring. Mix about 2 cups (250g) of powdered sugar with 1/3 cup (80ml) of liquid for a thin, glossy coat, then swap the liquid or add-in to build any of these six starters: vanilla, chocolate, maple, lemon, coffee, or salted caramel. Vanilla and lemon suit yeast donuts best; chocolate and salted caramel cling better to cake donuts. Most set within 8 to 20 minutes at room temperature.
TL;DR:
- Using water or skim milk instead of cream results in a firmer, crisper crackle finish similar to Krispy Kreme glaze.
- The ideal glazing window is 4 to 6 minutes after cooling, when the donut’s surface is warm but not hot, ensuring even adhesion.
- Sifting powdered sugar before mixing prevents lumps, and gradually adding liquid achieves a smoother, shinier glaze.
- Thicker, opaque glazes are best suited for cake or old-fashioned donuts, while thin, translucent glazes complement yeast varieties.
- Leftover glaze can be reheated and repurposed for drizzling, coating fruits, or filling cookies to avoid waste.
Table of Contents
- 30 donut glaze ideas to try this weekend
- The reliable base glaze: ratios, mixing steps and thickness
- How to glaze donuts: dipping, pouring and timing
- Fixing lumpy, runny or dull glaze
- Storing and reusing leftover glaze
- Matching glazes to donut types and toppings
- Using Missy Lala’s Cook Islands Donut Baking Mix with these glazes
- Nutritional considerations and allergy-friendly swaps
- How temperature changes your glaze’s finish
- Jasmin’s perspective: why glazing is worth the extra ten minutes
- Shop Missy Lala donut baking mixes
- Sources
- FAQ
30 donut glaze ideas to try this weekend
Once the base ratio is locked in, the fun part is swapping one or two ingredients to create a completely different flavour. Below are glaze ideas grouped loosely by style, each with a quick formula and a finishing touch that makes it look like it came from a proper bakery counter.
Classic and everyday glazes
- Vanilla bean glaze: Stir 1 teaspoon vanilla extract (or scrape half a vanilla pod) into the base liquid. Finish with a light dusting of extra sifted sugar for sparkle.
- Brown butter glaze: Brown 2 tablespoons of butter until nutty and amber, then whisk into the sugar with your liquid. Finish with a pinch of flaky salt.
- Honey glaze: Replace 2 tablespoons of the liquid with runny honey. Finish with a scatter of toasted coconut.
- Malted vanilla glaze: Add 1 tablespoon malt powder to the dry sugar before mixing. Finish with crushed malted milk balls.
Chocolate and coffee glazes
- Chocolate glaze: Melt 2 tablespoons butter with 2 tablespoons cocoa and a splash of milk over low heat until the sugar dissolves into a fudgy, glossy mixture. Finish with a light drizzle of white chocolate.
- Mocha glaze: Stir 1 tablespoon espresso powder and 1 tablespoon cocoa into the liquid before adding to the sugar. Finish with cocoa nibs.
- White chocolate glaze: Melt 30g white chocolate into the warm liquid before whisking into sugar. Finish with freeze-dried raspberry dust.
- Coffee glaze: Swap the liquid entirely for strong brewed coffee, cooled slightly. Finish with a dusting of ground cinnamon.
Fruit and citrus glazes
- Lemon glaze: Use fresh lemon juice as the liquid and add lemon zest to the dry sugar. Finish with extra zest right before serving.
- Orange glaze: Swap in fresh orange juice and a touch of zest. Finish with candied orange peel.
- Raspberry glaze: Blend and strain fresh raspberries to replace the liquid. Finish with a few whole freeze-dried raspberry pieces.
- Passionfruit glaze: Use strained passionfruit pulp as the liquid for a tangy, tropical edge. Finish with toasted coconut flakes.
- Blueberry glaze: Simmer blueberries with a splash of water, strain, and cool before using as the liquid. Finish with a light sugar dusting.
Seasonal and spiced glazes
- Cinnamon spice glaze: Add 1 teaspoon cinnamon and a pinch of nutmeg to the dry sugar. Finish with a sprinkle of demerara sugar.
- Pumpkin spice glaze: Stir 1 tablespoon pumpkin puree and pumpkin spice mix into the liquid. Finish with candied pecans.
- Gingerbread glaze: Add ground ginger, cinnamon, and a touch of molasses to the liquid. Finish with crushed ginger biscuits.
- Eggnog glaze: Use eggnog as the liquid with a pinch of nutmeg. Finish with a light grating of fresh nutmeg.
Nut, caramel and savoury-sweet glazes
- Maple glaze: Replace 2 tablespoons of the liquid with pure maple syrup. Finish with chopped toasted pecans.
- Salted caramel glaze: Stir in 2 tablespoons store-bought or homemade caramel sauce, then a pinch of sea salt. Finish with more flaky salt.
- Peanut butter glaze: Whisk 1 tablespoon smooth peanut butter into the warm liquid before combining with sugar. Finish with crushed peanuts.
- Tahini honey glaze: Blend 1 tablespoon tahini with honey and warm water. Finish with sesame seeds for a nutty, savoury edge.
- Brown sugar bacon glaze: Use brown sugar in place of some white sugar and top with crumbled crispy bacon. Finish while the glaze is still tacky so the topping sticks.
Island-style and tropical twists
- Coconut-lime glaze: Use coconut milk as the liquid and add fresh lime zest and juice. Finish with toasted shredded coconut.
- Pineapple glaze: Use reduced pineapple juice as the liquid for a sweet, slightly tart finish. Finish with dried pineapple bits.
- Mango glaze: Blend ripe mango with a splash of lime juice as the liquid. Finish with a pinch of chilli-lime salt for contrast.
Vegan and dairy-free glazes
- Oat milk vanilla glaze: Swap dairy milk for oat milk, which mimics dairy mouthfeel most closely among plant milks, and add 1 teaspoon neutral oil per cup for sheen. Finish with a light dusting of sugar.
- Coconut cream glaze: Use thick coconut cream as the liquid for a naturally rich, dairy-free glaze. Finish with toasted coconut.
- Almond milk berry glaze: Blend almond milk with mashed strawberries for colour and flavour. Finish with freeze-dried strawberry dust.
Keep a small dish of extra sifted sugar and a few finishing garnishes on the bench before you start. Once the glaze is mixed, timing matters more than creativity, so having toppings ready means you’re not scrambling while the glaze sets.
The reliable base glaze: ratios, mixing steps and thickness
The dependable formula behind almost every glaze on this page is 2 cups (250g) powdered sugar to 1/3 cup (80ml) liquid, plus a teaspoon of flavouring. That ratio gives you a thin, translucent glaze that sets with a light sheen. Want something thicker and more opaque, closer to an icing? Cut the liquid back to 3 to 4 tablespoons per 2 cups of sugar.
For anyone baking in bulk, weight-based scaling holds up better than cups. A workable range is roughly 1kg powdered sugar to 160 to 220g liquid, depending on how thick you want the finish, and you can scale that down linearly for a single dozen.
| Sugar | Liquid | Result |
|---|---|---|
| 2 cups (250g) | 1/3 cup (80ml) | Thin, glossy, translucent glaze |
| 2 cups (250g) | 3 to 4 tbsp | Thicker, opaque icing-style glaze |
| 1kg | 160 to 220g | Bulk batch, adjustable by feel |
Pro Tip: Sift the sugar before you add any liquid. Tiny lumps are nearly impossible to whisk out once the liquid goes in, and a fine sieve takes about thirty seconds.
Mixing itself is simple. Sift the sugar into a bowl, then add the liquid gradually, a tablespoon at a time, whisking continuously until it turns glossy and drips off the whisk in a ribbon. Let it rest for a couple of minutes so any last air bubbles settle, then check the thickness one more time before you glaze anything.
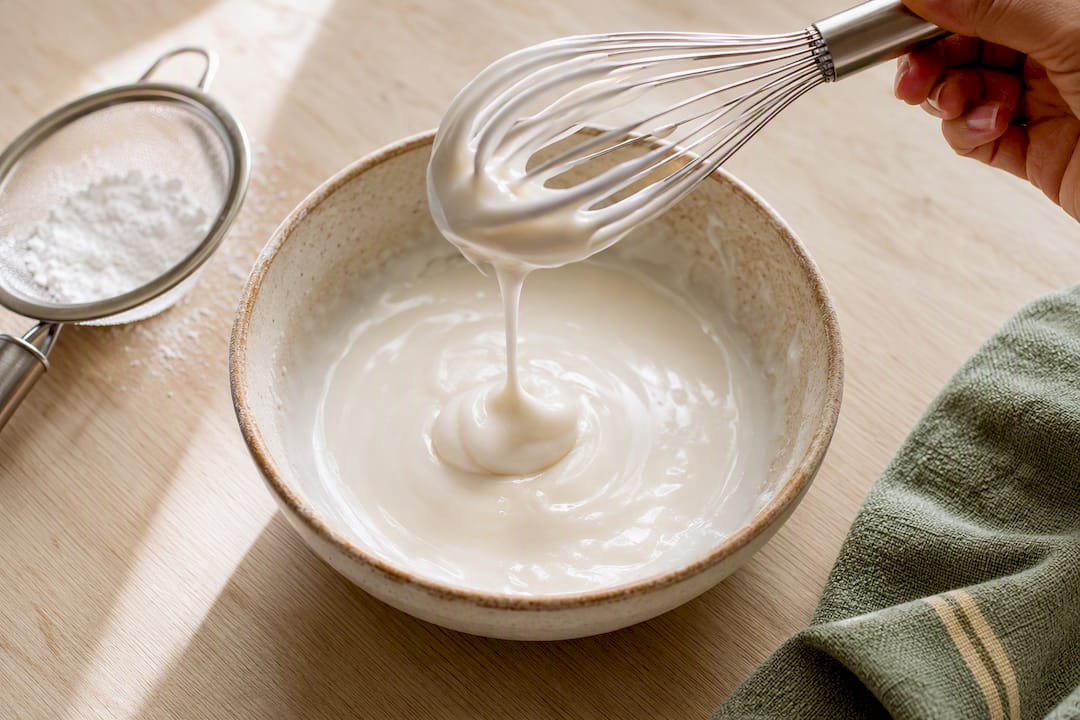
The liquid you choose changes more than flavour. Milk usually results in a softer set, while water produces a firmer crackle. Citrus juice adds acidity and a slightly matte finish. Brewed coffee, cooled first, adds colour and bitterness that pairs beautifully with cake donuts.
How to glaze donuts: dipping, pouring and timing
Getting a glaze to stick evenly comes down to timing more than technique. Here’s the sequence that works every time:
- Cool for 4 to 6 minutes. Fresh donuts need to lose enough heat that the surface is warm, not hot, so the glaze clings instead of sliding straight off.
- Dip for 1 to 2 seconds. Hold the donut top-down in the glaze bowl, submerge briefly, and lift straight up.
- Let it drip for 8 to 12 seconds. Hold it over the bowl before transferring it, so excess glaze runs off rather than pooling on a plate.
- Rest on a wire rack over parchment. This lets air circulate underneath and keeps the glaze from puddling into a sticky ring.
- Double dip for a thicker shell. Wait two to three minutes for the first coat to tack up, then dip again for a proper bakery-style finish.
Pouring and drizzling suit toppings and patterns better than a full dunk. A small jug or a piping bag with the tip snipped off gives you control for zigzags, stripes, or filling in a donut hole. Add any sprinkles, nuts, or zest within the first minute after glazing, while the surface is still tacky enough to hold them in place.
Pro Tip: If you’re glazing a large batch, glaze in the same order you fried or baked the donuts. The first batch will have cooled to the ideal window by the time you’ve finished the last one.
Fixing lumpy, runny or dull glaze
Most glaze problems trace back to one of three causes: too much liquid, unsifted sugar, or the wrong liquid for the job. Runny glaze needs more sifted sugar, added a tablespoon at a time, whisked in fully before you judge the thickness again. Grainy glaze almost always means the sugar wasn’t sifted or the liquid was too cold to dissolve it properly, so a brief warm and re-whisk usually saves it. Glaze that won’t set is often too high in fat. Heavy cream and full-fat liquids resist hardening into a proper shell, so switch to milk or water for the next batch.
- Runny: Add sifted sugar gradually, one tablespoon at a time, until it thickens.
- Grainy or lumpy: Warm gently and whisk vigorously; strain through a sieve if lumps persist.
- Won’t set: Swap to a lower-fat liquid like water or skim milk and check your ratio.
- Dull, no shine: Whisk longer and let the glaze rest 20 to 30 minutes before use.
You don’t need corn syrup for shine. Thorough whisking followed by a 20 to 30 minute rest is what actually produces the glossy look most people credit to corn syrup. For a proper crackle finish, the kind that shatters slightly when you bite in, use a lower-fat liquid and aim for a set time of 15 to 20 minutes at room temperature. Cream-based glazes almost never crackle; water and milk-based ones do.
Storing and reusing leftover glaze
Powdered-sugar glaze keeps in an airtight container in the fridge for up to a week. Ganache-style chocolate glazes last about the same, while caramel glazes can stretch to two weeks if kept sealed and cold.
Reconditioning is straightforward: warm the glaze gently in the microwave in short bursts, or over a low double boiler, whisking between each burst. If it’s still too thick, add a teaspoon of liquid at a time until it drips smoothly off a spoon again.
Leftover glaze rarely needs to go to waste. Try one of these:
- Drizzle it over pancakes or waffles for a quick breakfast upgrade.
- Warm it slightly and use it as a cake or cupcake icing.
- Spoon it over sliced fruit like bananas or strawberries as a simple dessert.
- Use thicker leftover glaze as a filling between two cookies.
Matching glazes to donut types and toppings
Yeast donuts have an airy, open crumb, so a thin, translucent glaze lets the texture show through rather than smothering it. Cake donuts and old-fashioned donuts are denser and richer, so they carry thicker, opaque glazes or ganache without feeling heavy.
| Glaze | Best donut type | Topping suggestion |
|---|---|---|
| Vanilla (thin) | Yeast | Rainbow sprinkles |
| Chocolate ganache | Cake or old-fashioned | Chopped toasted nuts |
| Lemon (thin) | Yeast | Fresh lemon zest |
| Maple | Cake | Crumbled bacon |
| Coconut-lime | Yeast | Toasted coconut flakes |
| Salted caramel | Old-fashioned | Flaky sea salt |
If you’re layering a glaze with a second accent, like a drizzle over a base coat, let the first layer set for three to four minutes before adding the next. Adding a second layer too early just blends the two together and loses the contrast you’re after.
Using Missy Lala’s Cook Islands Donut Baking Mix with these glazes
Missy Lala’s Cook Islands Donut Baking Mix produces a donut with a tender, slightly dense crumb that holds a glaze well in either direction, thin and translucent or thick and opaque. Because the mix comes together with just water and oil, you can have donuts cooling and ready to glaze inside an hour, which matters when you’re testing several flavours in one sitting.
Two easy pairings to start with: a classic vanilla glaze over the plain mix gives you a bakery-style everyday donut, while a coconut-lime glaze with toasted coconut leans into the mix’s island roots for something a bit more festive. For extra texture tips before you glaze, the guide on improving box donut mix covers resting and frying adjustments that make a real difference to how well the glaze sits.
Nutritional considerations and allergy-friendly swaps
A standard powdered-sugar glaze is mostly sugar, so portion size matters more than ingredient tweaks if you’re watching sugar intake. Cutting the liquid slightly and using a lower-sugar base isn’t really an option here, since the sugar is what gives the glaze its structure, but you can lighten the overall donut by choosing a thin glaze over a thick one.
For dairy-free bakers, plant milk swaps work well as long as you compensate for the missing fat. Oat milk is the closest single swap for both texture and flavour, but adding a teaspoon of neutral oil per cup improves sheen and stops the glaze from cracking as it sets.
Nut-based glazes like peanut butter or tahini honey obviously aren’t suitable for anyone with a nut or sesame allergy, and it’s worth double checking labels on store-bought caramel or chocolate for hidden traces. Gluten sensitivity sits with the donut base rather than the glaze itself, since a standard sugar glaze contains no flour or gluten.
If you’re baking for a mixed group, the simplest approach is to make one neutral batch (plain vanilla, made with water instead of milk) that covers most dietary needs, then offer a couple of specialty glazes on the side for people to add themselves.
How temperature changes your glaze’s finish
Temperature affects a donut glaze at almost every stage, not just the final set. A glaze mixed with cold liquid straight from the fridge takes longer to dissolve the sugar fully, which is one of the most common causes of a grainy texture. Letting your liquid sit at room temperature for ten minutes before mixing solves this without any extra ingredients.
The donut’s own temperature matters just as much. Glaze applied to a donut that’s still steaming hot will run straight off, pooling around the base instead of coating the surface. Glaze applied to a fully cooled donut sits on top without soaking in, giving a thinner, less even coat. The four to six minute cooling window hits the point where the surface is warm enough to help the glaze adhere and slightly absorb, but not so hot that it thins out and slides.
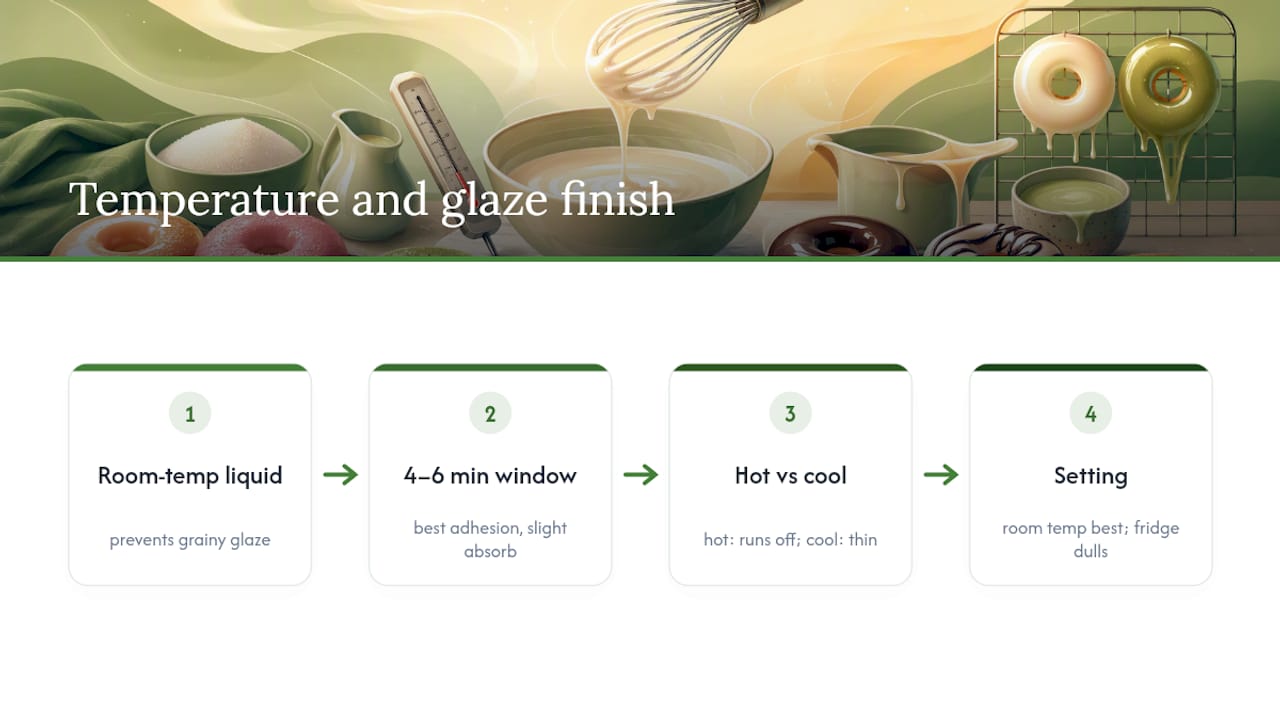
Once glazed, room temperature is generally best for setting. A fridge speeds up setting time but can make some glazes look dull or slightly tacky when they come back to room temperature, since sugar behaves differently across a temperature swing. If you need a glaze to set fast for photos or a party, a few minutes in a cool room with a fan works better than a trip to the fridge.
Jasmin’s perspective: why glazing is worth the extra ten minutes
I’ve watched kids stand at the kitchen bench arguing over whether the lemon glaze or the chocolate one wins, and that’s really the point of all this. A donut mix that comes together in under an hour buys you the time to actually play with flavours instead of rushing dinner. The barrier isn’t skill, it’s belief that glazing is fussy. It isn’t. One bowl, one whisk, ten minutes, and suddenly everyone at the table has an opinion on dessert.
— Jasmin
Shop Missy Lala donut baking mixes
A baking mix that requires just water and oil lets you make soft, island-style donuts ready to glaze inside an hour, so the only real decision left is which flavour to make first.
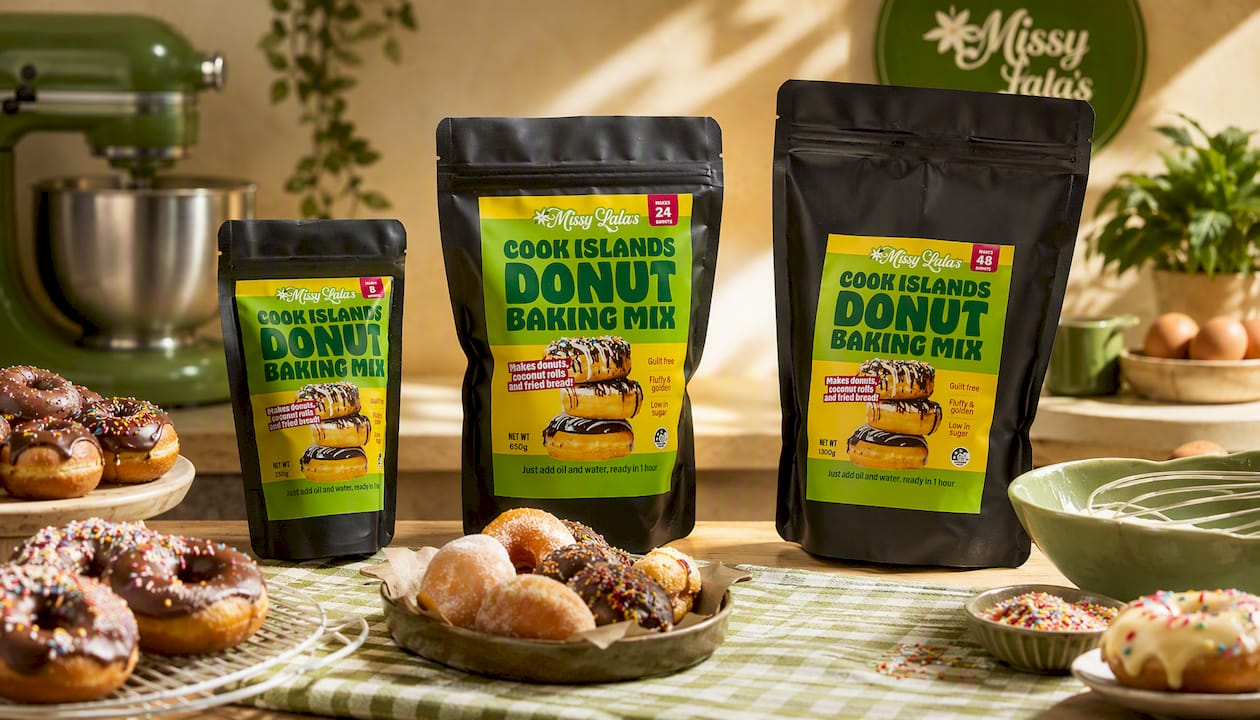
Pick your size based on how many hands will be reaching for a donut. The 250g mix suits a single household batch or a first attempt at a new glaze. The 650g mix covers a family weekend bake with enough donuts to test two or three glazes at once. The 1300g mix is built for parties, markets, or bakers who want enough dough to run through several flavours from this list in one session.
If you want more technique before you start, the guide to mastering doughnut baking mix covers texture tips that pair well with everything above. Browse the full donut mix range to pick a size and get glazing this weekend.
Sources
These are the sources behind the ratios and technique advice in this guide. Food Republic confirms the standard three-ingredient base ratio. Chef Lindsey Farr explains how liquid choice affects crackle finish and set time. Erren’s Kitchen backs the sifting step for a lump-free glaze. An Edible Mosaic covers the cooked chocolate glaze method for a corn-syrup-free shine.
- Here’s how to make a delicious donut glaze with minimal ingredients — Food Republic
- Classic donut glaze — Chef Lindsey Farr
- Donut glaze recipe — Erren’s Kitchen
- Easy chocolate donut glaze recipe — An Edible Mosaic
FAQ
What is a good glaze for donuts?
A good all-round glaze is the classic three-ingredient version: sifted powdered sugar, a liquid like milk or water, and a flavouring such as vanilla. It’s the base most other glazes on this page build from, so mastering it first makes every flavour swap easier.
How do I make a donut glaze like Krispy Kreme?
The closest home version uses a thin sugar glaze made with water rather than milk, since water produces the firmer, glossier shell associated with that style. Dip warm donuts briefly, let them drip on a wire rack, and avoid heavy cream, which softens the set.
How do I get donut glaze to harden into a crackle shell?
Use a lower-fat liquid like water or skim milk and let the glazed donuts sit at room temperature for 15 to 20 minutes. Cream-based glazes rarely crackle properly because the extra fat stops the sugar shell from setting hard.
What is Krispy Kreme glaze made of?
It’s built on the same core idea as a standard donut glaze: powdered sugar, a liquid, and vanilla flavouring, whisked until smooth and glossy. The exact recipe is proprietary, but the same three-ingredient base used throughout this guide gets you very close at home.
Can I make a dairy-free donut glaze that still looks glossy?
Yes. Oat milk is the closest plant-based match for dairy in both texture and flavour, and adding a teaspoon of neutral oil per cup improves sheen and helps stop the glaze cracking as it sets.


